Tisalabs Knowledge Base
Phishing remains one of the most prevalent cyber threats, and organizations must be proactive in testing their defenses against such attacks. In this tutorial, we'll walk through the process of executing a phishing email attack using Predictive, a powerful open-source phishing simulation tool. By following these steps, you'll gain insights into your organization's susceptibility to phishing attacks and strengthen your cybersecurity posture.
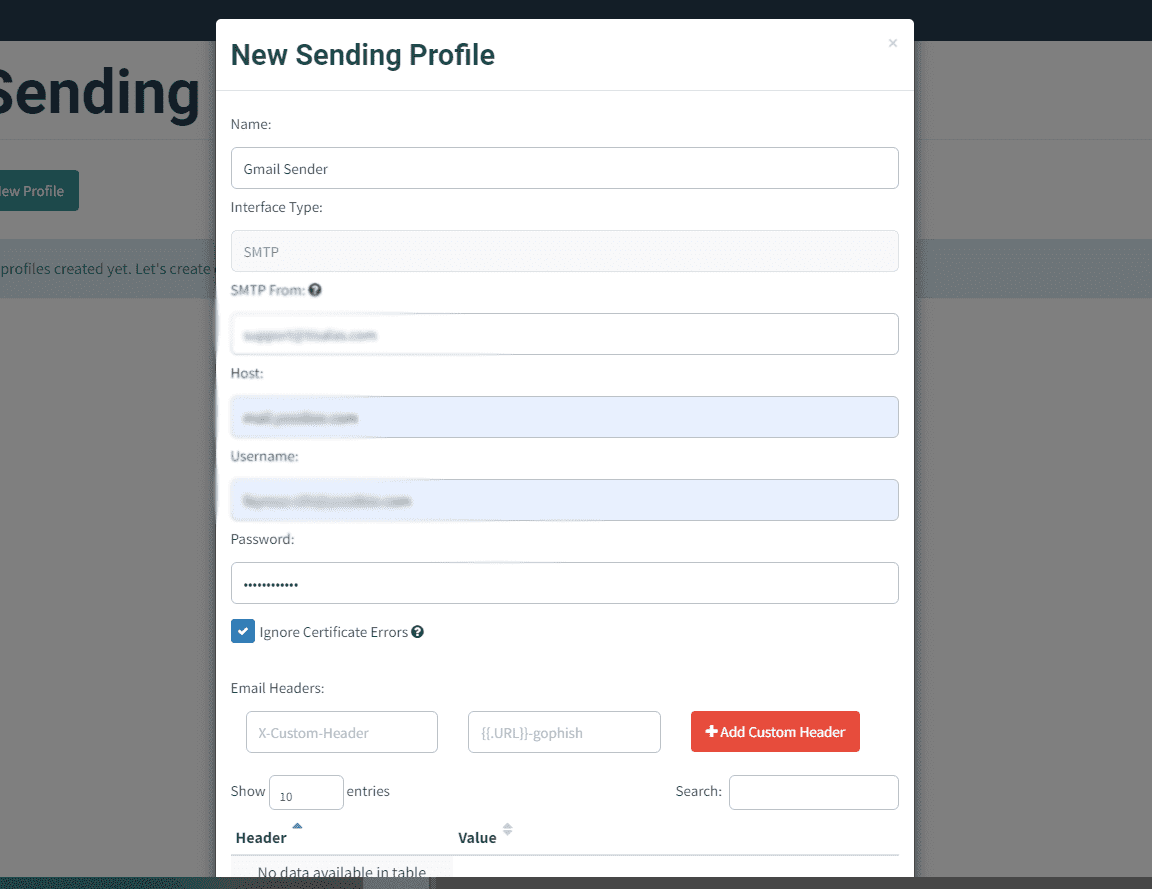
To begin, we need to establish a sender profile. This is crucial as it determines the credibility of the phishing email. Choose an email address that appears authentic, such as one mimicking a trusted source within the organization, like the CEO or IT department.
Step 1: Define Sender Profile
Select a convincing sender email address and ensure the username is tailored to enhance credibility.

Step 2: Test Configuration
Send a test email to verify the configuration and ensure successful delivery.

Next, we'll assign target users for the phishing campaign by creating user groups. This step enables us to tailor the attack to specific segments of the organization.

Step 1: Create Users and Groups
Manually add individual recipients or import users from a CSV file for larger-scale campaigns.

Step 2: CSV Import
Utilize the "bulk import users" option for efficiency when adding multiple users.
The success of a phishing email hinges on its persuasiveness. In this section, we'll design an email template that entices recipients to take the desired action, such as clicking on a malicious link or providing sensitive information.
Step 1: Design Email Content
Compose compelling email content that leverages psychological triggers to prompt user interaction.

Step 2: Template Importance
Highlight the significance of the email template in driving user engagement and increasing the likelihood of success.

This part is the most important and the content of the email should convince the user take whatever action you want him to take. We are just showing the age-old account reset email.

In this step, we'll create a fake landing page that mirrors the appearance of a legitimate website. This page will serve as the destination for users who click on the phishing link.
Step 1: Develop Landing Page
Design a phishing website that closely resembles the targeted platform, ensuring authenticity to enhance user deception.
Step 2: Taiga Platform Example
Demonstrate the creation of a fake login page for the Taiga platform to capture user credentials.
For this example , we will be capturing some credentials from our taiga platform. Hence I did create the login page of taiga website from scratch , I made sure to make it look like the maximum.
Landing page in Predictive is the page where users will be redirected to after clicking a link in the email.


Then we will get the landing page created in the landing pages:

Now that all components are in place, it's time to launch the phishing campaign and monitor its progress.
Step 1: Start Campaign
Navigate to the campaigns section and initiate a new campaign, configuring settings as required.

Then we will get the notification of the campaign started as follows:

Step 2: Dashboard Monitoring
Monitor campaign results from the dashboard, tracking user interactions and email open rates.

Finally, we'll review the outcomes of the phishing campaign, analyzing data collected from user interactions and assessing the effectiveness of our attack.
Step 1: Email Appearance
Inspect how the phishing email appears in recipients' inboxes.

Step 2: Email Content
Review the content of the phishing email to understand its structure and persuasive elements.

Step 3: Phishing Site
Examine the phishing website and the data collected from users redirected to the site.

Step 4: Data Collection
Analyze the data collected from user interactions, including credentials entered on the phishing site.

Step 5: Dashboard Insights
Evaluate campaign data available in the dashboard to gauge the success of the phishing attack.

By following this tutorial, you've gained valuable insights into executing a phishing email attack using Predictive. Remember, the goal is not only to assess your organization's vulnerabilities but also to educate users and implement robust security measures to mitigate the risk of future attacks.
If you still can't find an answer to what you're looking for, or you have a specific question, open a new ticket and we'd be happy to help!
Contact Us